

How to Use Qwen Image 2.1: The 2026 ComfyUI Walkthrough
Qwen-Image 2.1 is Alibaba's open-weights image model, released September 20, 2026: one 7B network that generates and edits pictures, writes native transparent PNGs, and merges up to 10 reference images at up to 2K resolution. This 16-step walkthrough follows a full ComfyUI tutorial from downloading the model files to transparent cutouts, character sheets, and camera-angle consistency.
Source & credits
Screenshots in this guide are captured from ComfyUI Workflow Blog's public walkthrough video. Every step links back to the exact moment it shows, so you can follow along.
ComfyUI Workflow Blog ↗Meet Qwen-Image 2.1: Alibaba's Free 7B Image Model
- 1
Meet Qwen-Image 2.1, the 7B model that edits too
Qwen-Image 2.1, released by Alibaba on September 20, 2026, unifies text-to-image generation and editing in one 7B model with 32 single-stream DiT layers. It writes transparency straight into your images, accepts up to 10 reference photos, and outputs up to native 2K. Try it free in the official Hugging Face demo Space, or follow this guide to run it locally in ComfyUI.
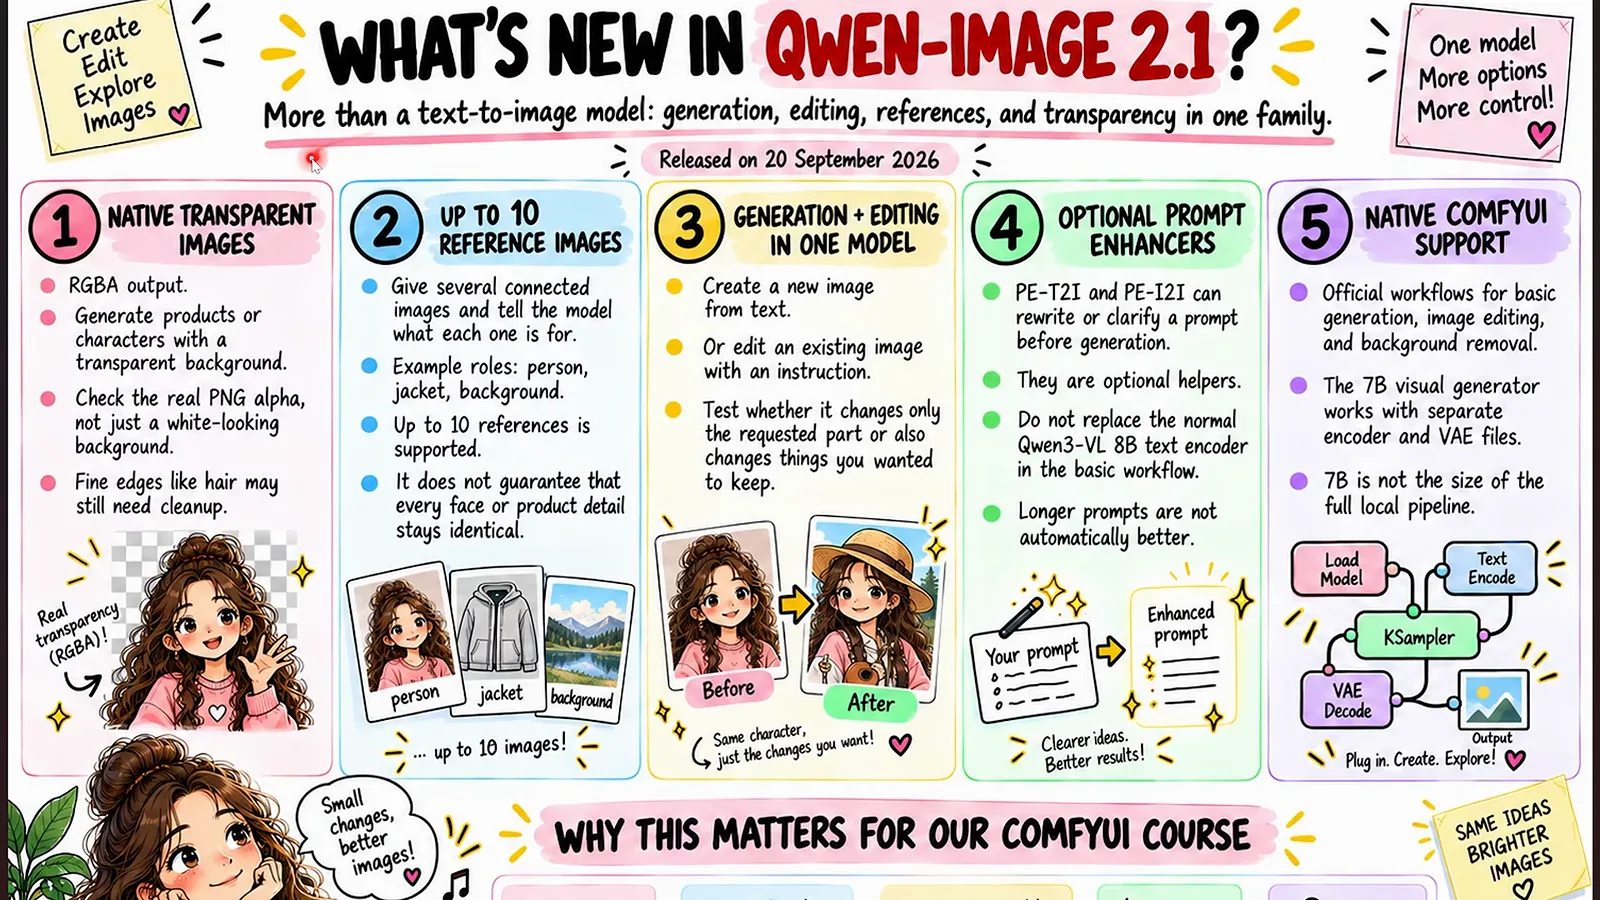
The release poster's headlines are exactly what this guide walks through.Watch at 0:20 - 2
Download the three ComfyUI model files
ComfyUI needs three downloads: the image model in INT8 (about 7.3 GB, lighter on VRAM) or BF16 (about 14.2 GB, full precision), the Qwen3-VL-8B text encoder (about 9.4 GB), and the Qwen-Image 2.1 VAE (about 676 MB). Pick INT8 for smaller graphics cards and BF16 for maximum quality. Drop each file into its matching subfolder under ComfyUI's models directory.
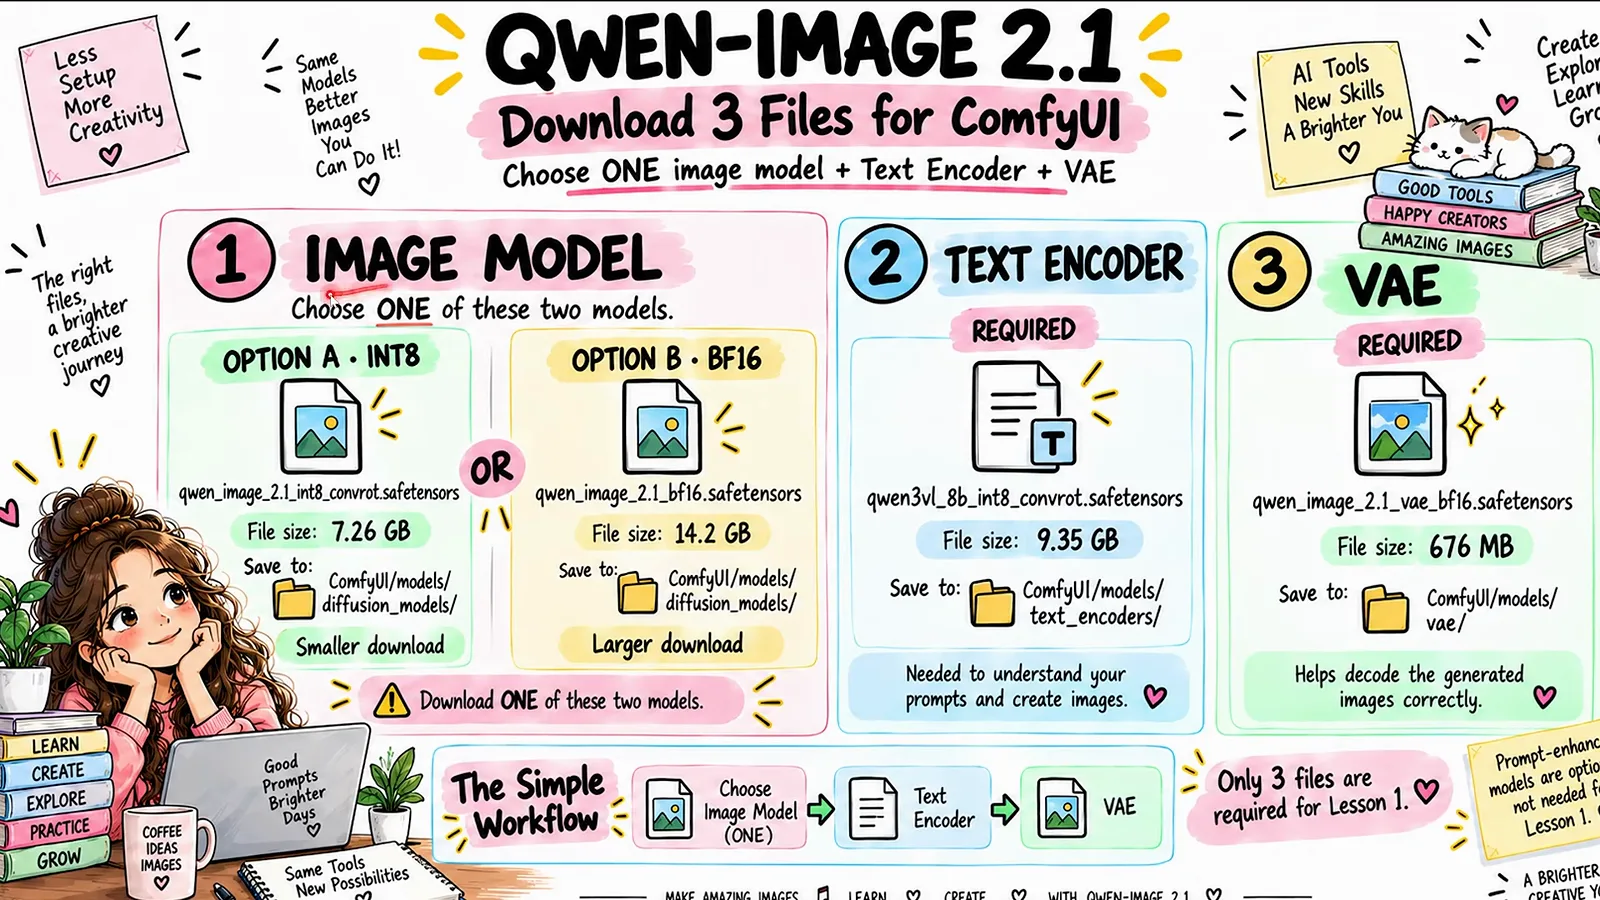
Two model variants, one text encoder, one VAE — that is the whole shopping list.Watch at 0:40 - 3
Wire the three loader nodes together
Update ComfyUI first so the dedicated Qwen-Image 2.1 text-encode node and workflow templates appear. In the graph, Load Diffusion Model points at your qwen_image_2.1 file, Load CLIP loads Qwen3-VL-8B, and Load VAE picks the 2.1 VAE. Once all three feed the sampler, the text-to-image pipeline is complete.
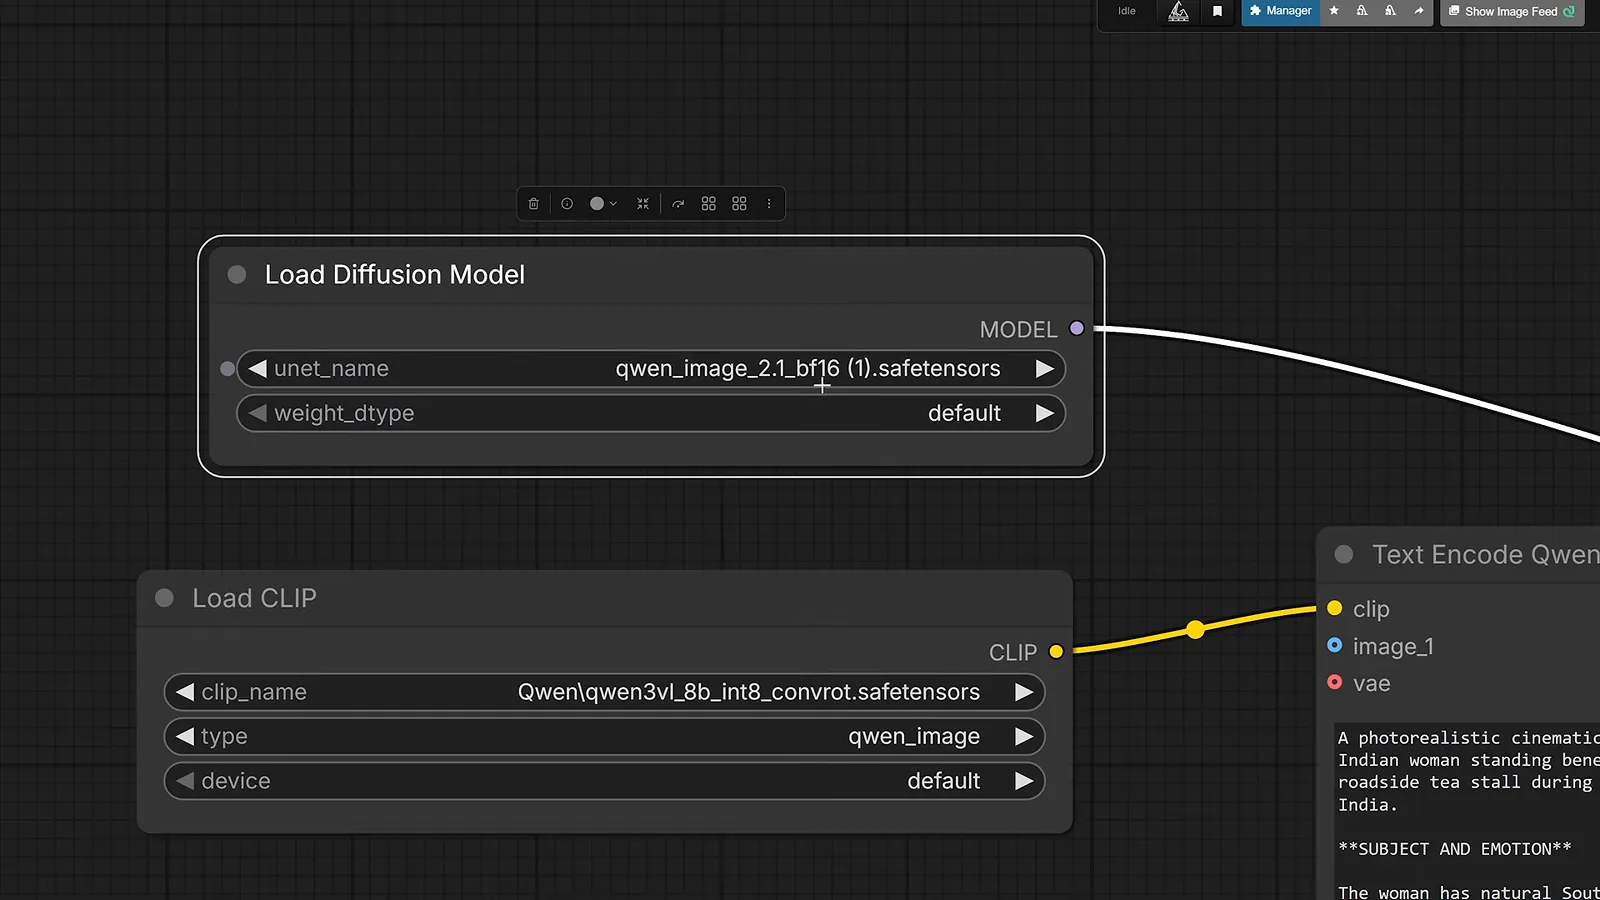
One loader per downloaded file — the graph mirrors your models folder.Watch at 1:30
Generate Images in ComfyUI, Step by Step
- 4
Start from 25 steps, CFG 1, Euler
The official template's baseline is 25 steps, CFG 1, and the Euler sampler with the simple scheduler. Because CFG 1 skips the negative prompt entirely, fold exclusions like “no text, no watermark” into the main prompt instead. The tutorial's BF16 render finished in roughly 10 seconds on an RTX 5090.
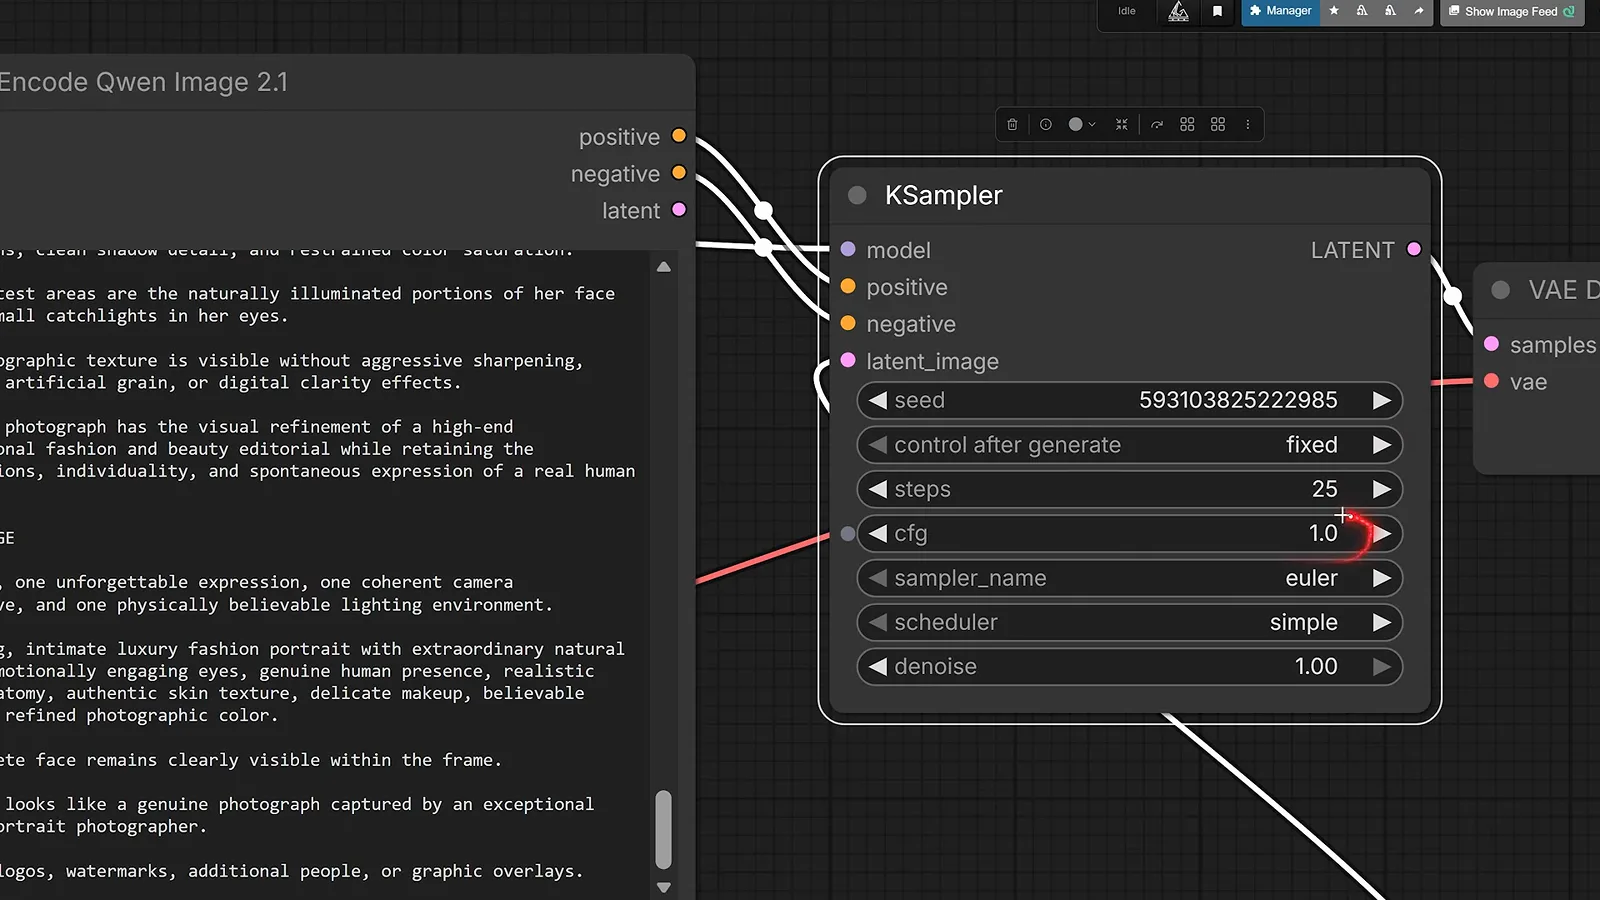
These are the template defaults — change one dial at a time from here.Watch at 1:45 - 5
Run your first text-to-image render
Type a descriptive prompt into the Qwen-Image 2.1 text-encode node and queue the graph. The first test portrait came back with believable skin texture, correctly drawn earrings, and none of the plastic AI look. Keep the seed fixed while you reword, so every difference comes from the prompt itself.
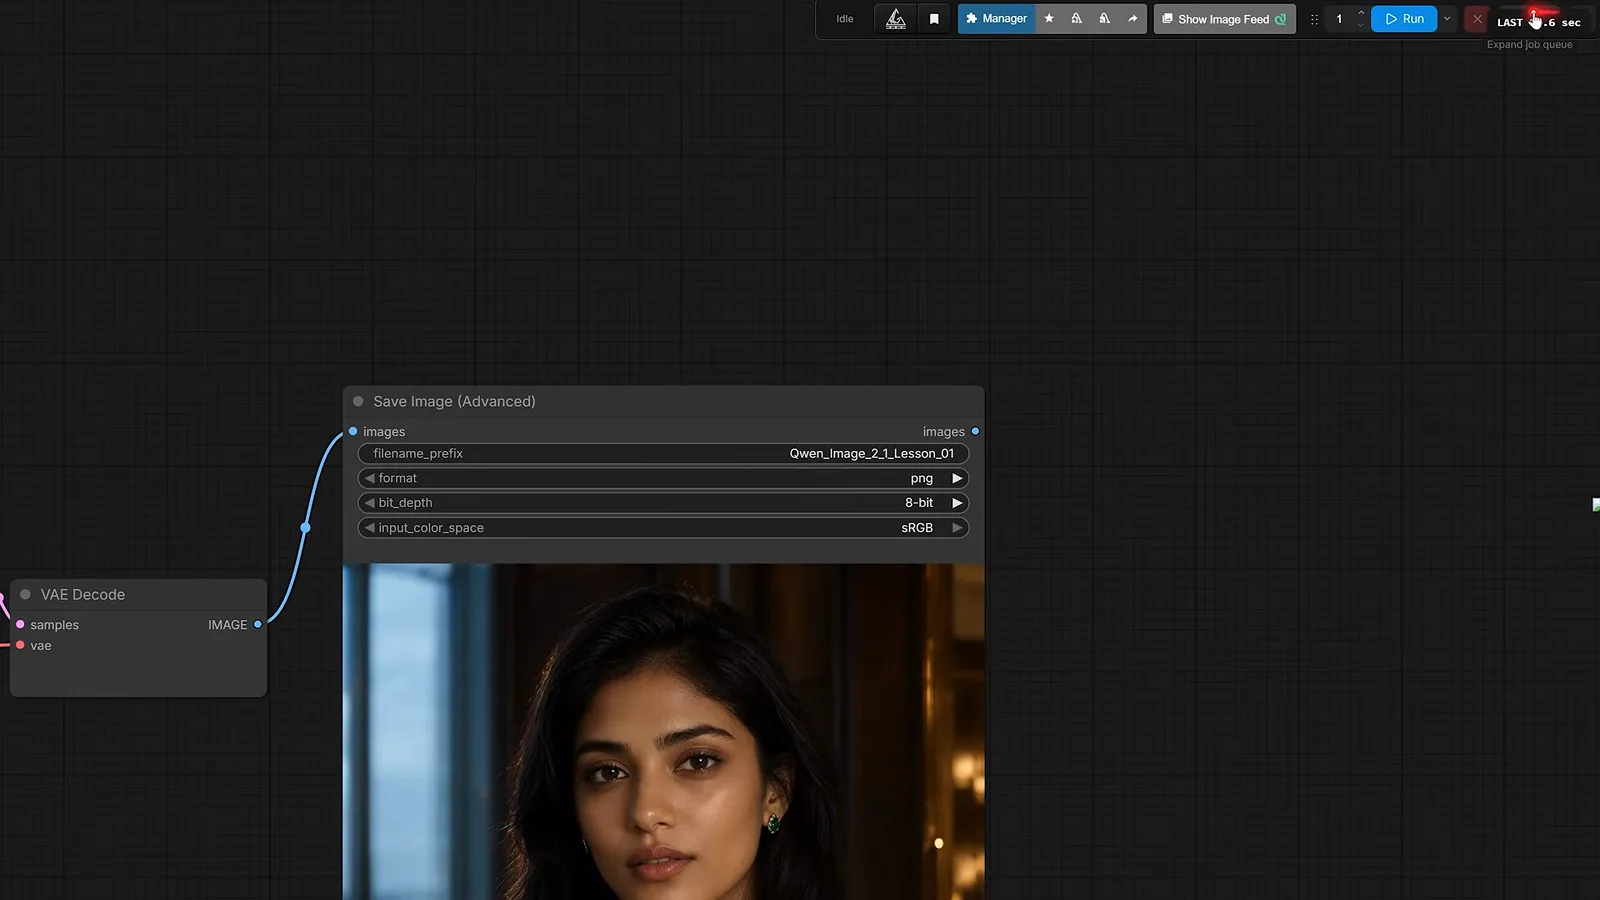
A simple portrait is the fastest smoke test for a fresh install.Watch at 2:01 - 6
Build prompts from the seven slots
The tutorial's cheat sheet fills seven slots in order: subject, composition, environment, lighting, details, output goal, and exclusions. With CFG 1 ignoring the negative field, write exclusions as plain text — “no logo, no cropped body”. The guide's side-by-side examples show a vague prompt and the same idea structured, and the difference is stark.
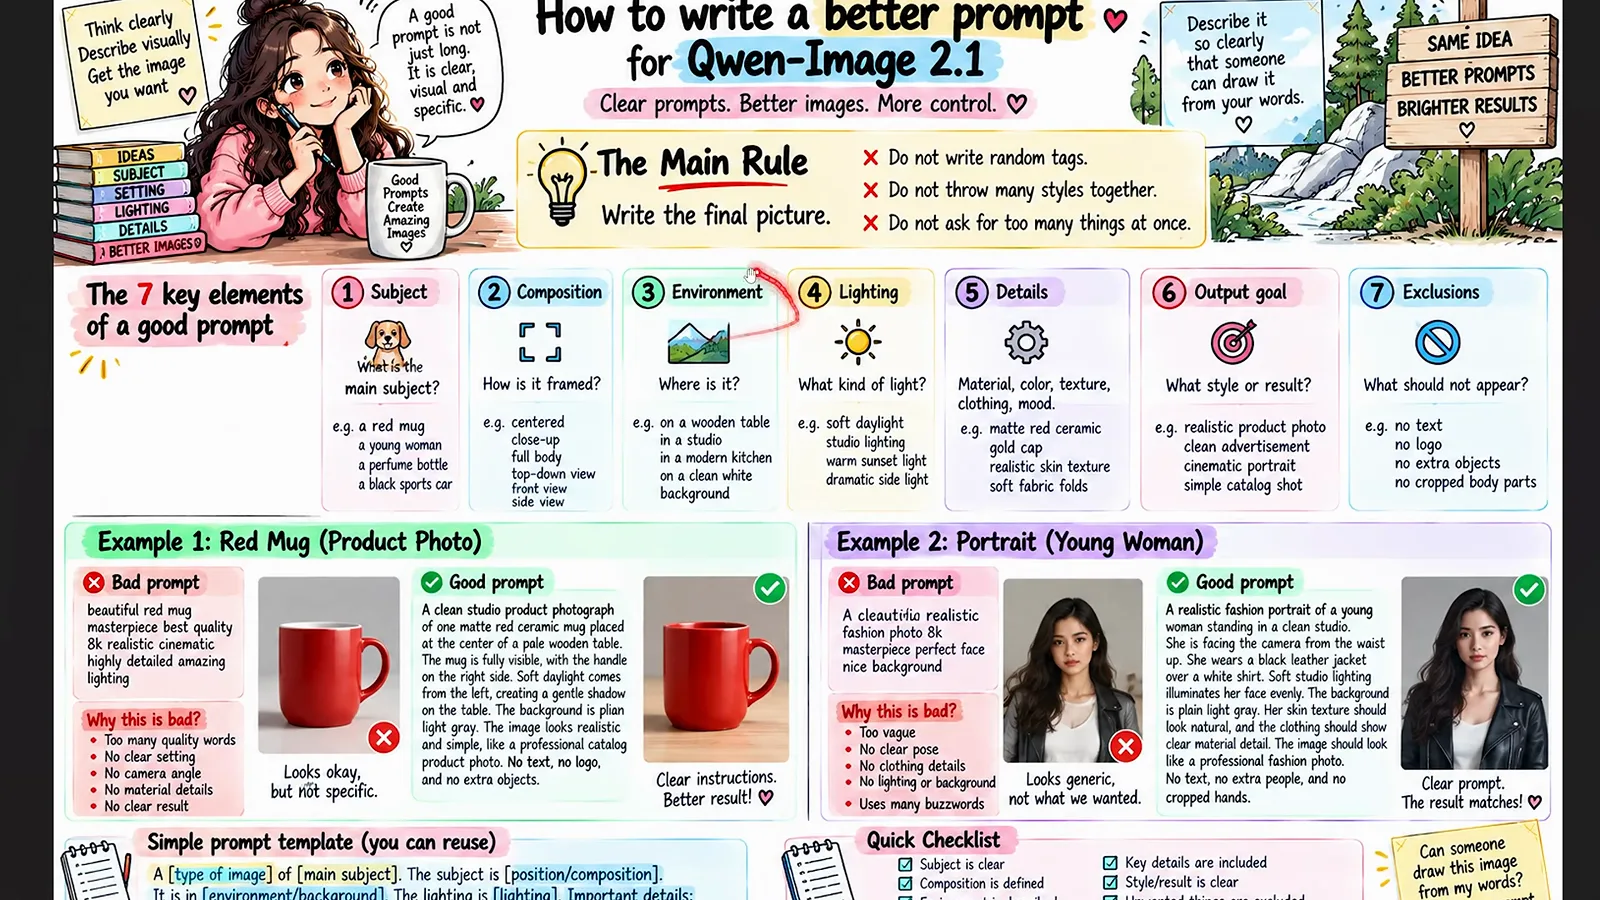
Fill the slots once and you stop regenerating on luck.Watch at 4:40 - 7
Fix hands and props by raising resolution
When a cup or a foot renders wrong, the creator's first fix is resolution: bump the Resolution Selector from 2 megapixels toward 4. A note inside the workflow lists exact pixel sizes per aspect ratio, including 2752x1536 for 16:9. Bigger renders take longer, so draft small and re-run at full size only when the composition works.
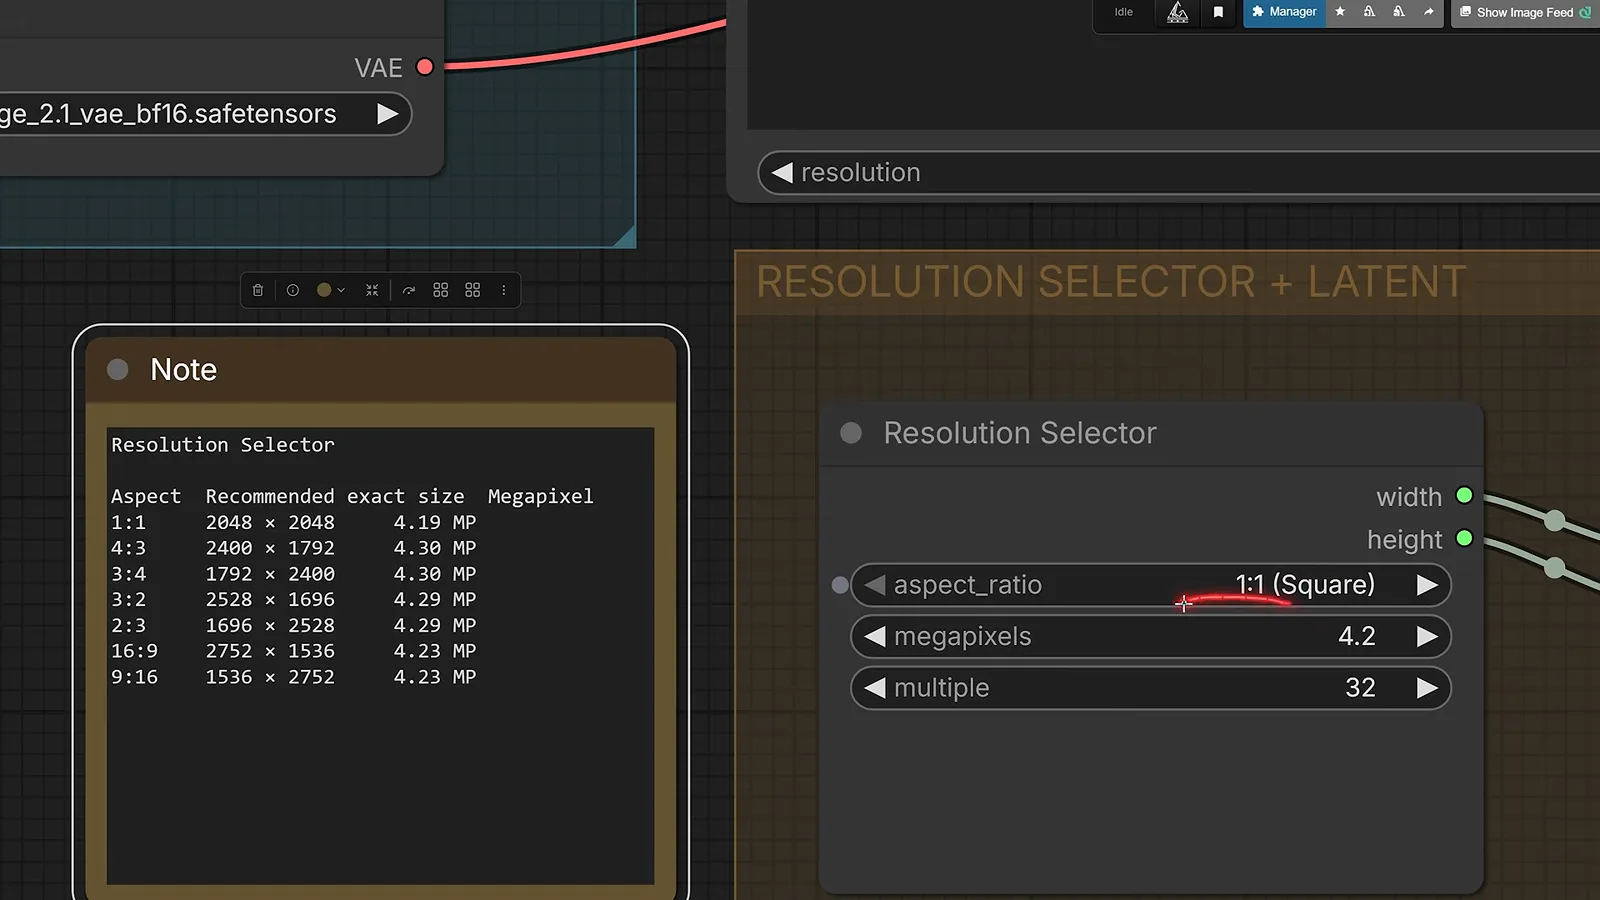
Most anatomy glitches in testing disappeared once the megapixels went up.Watch at 4:00 - 8
Raise steps to 40 for sharper faces
The official ComfyUI template ships at 25 steps, but the model developers' own examples use 40 — and in the tutorial's test, 40 steps added visible detail to the face. The cost is time: renders scale roughly with the step count. For poster-style typography the extra steps also tightened letterforms.
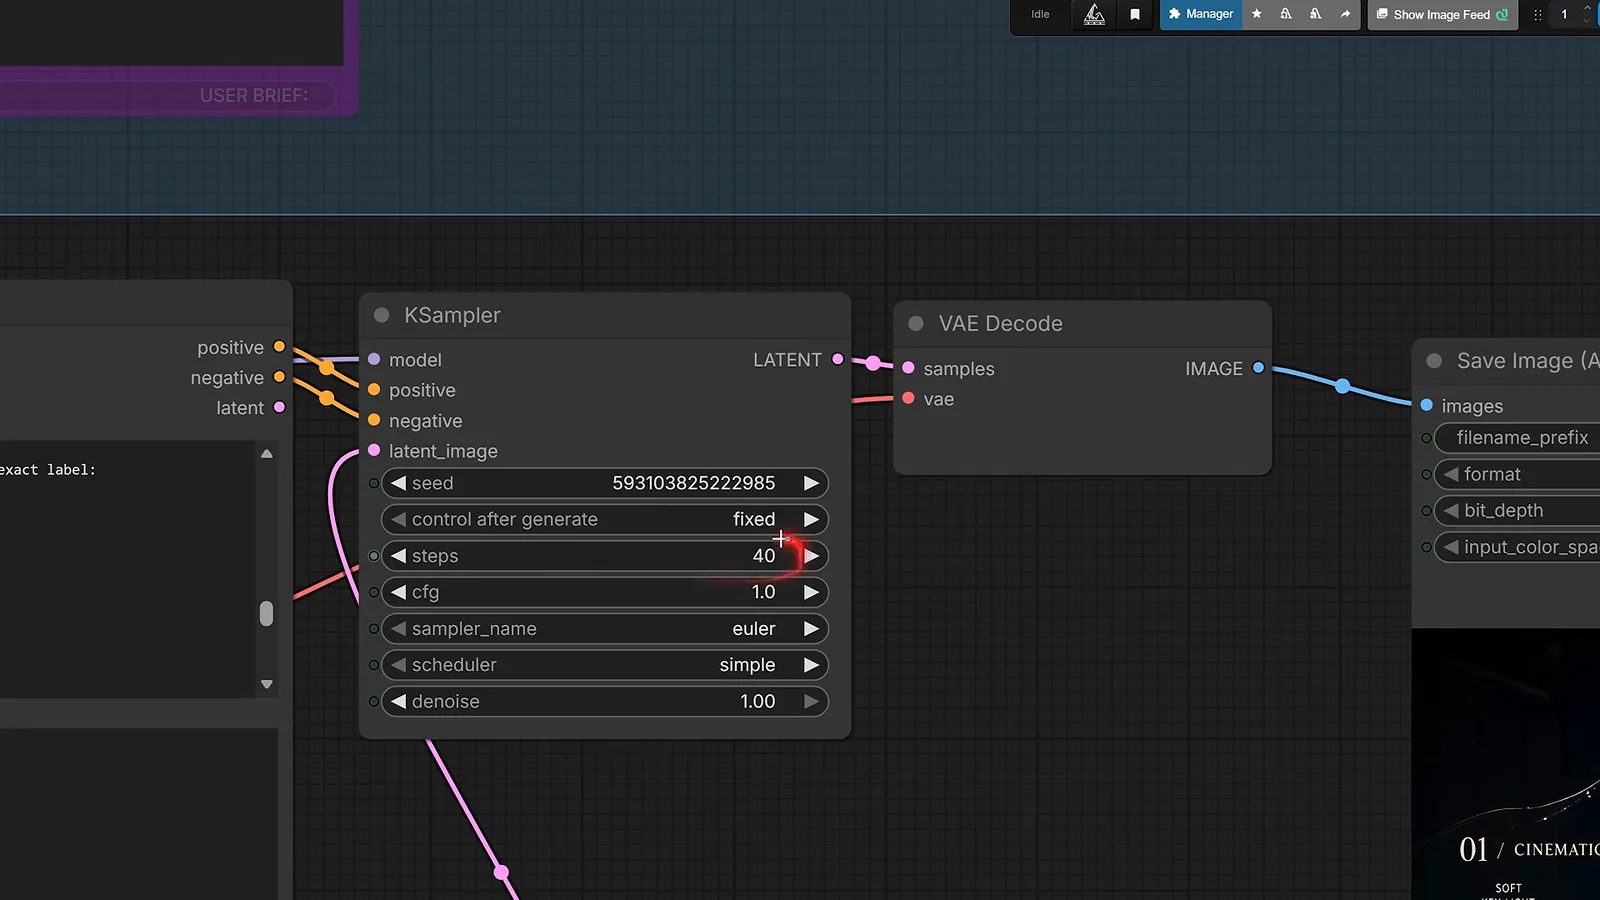
Same workflow, 40 steps — the face and the small print both gained definition.Watch at 6:53
Edit, Extract, and Stay Consistent
- 9
Say RGBA to get transparent PNGs
Transparency is native: open the edit prompt with “This is an RGBA image with transparency”, then describe the cutout you want. Save the result as PNG, because JPEG throws the alpha channel away. Testers note the alpha edges can stay slightly noisy, so plan one cleanup pass for production assets.
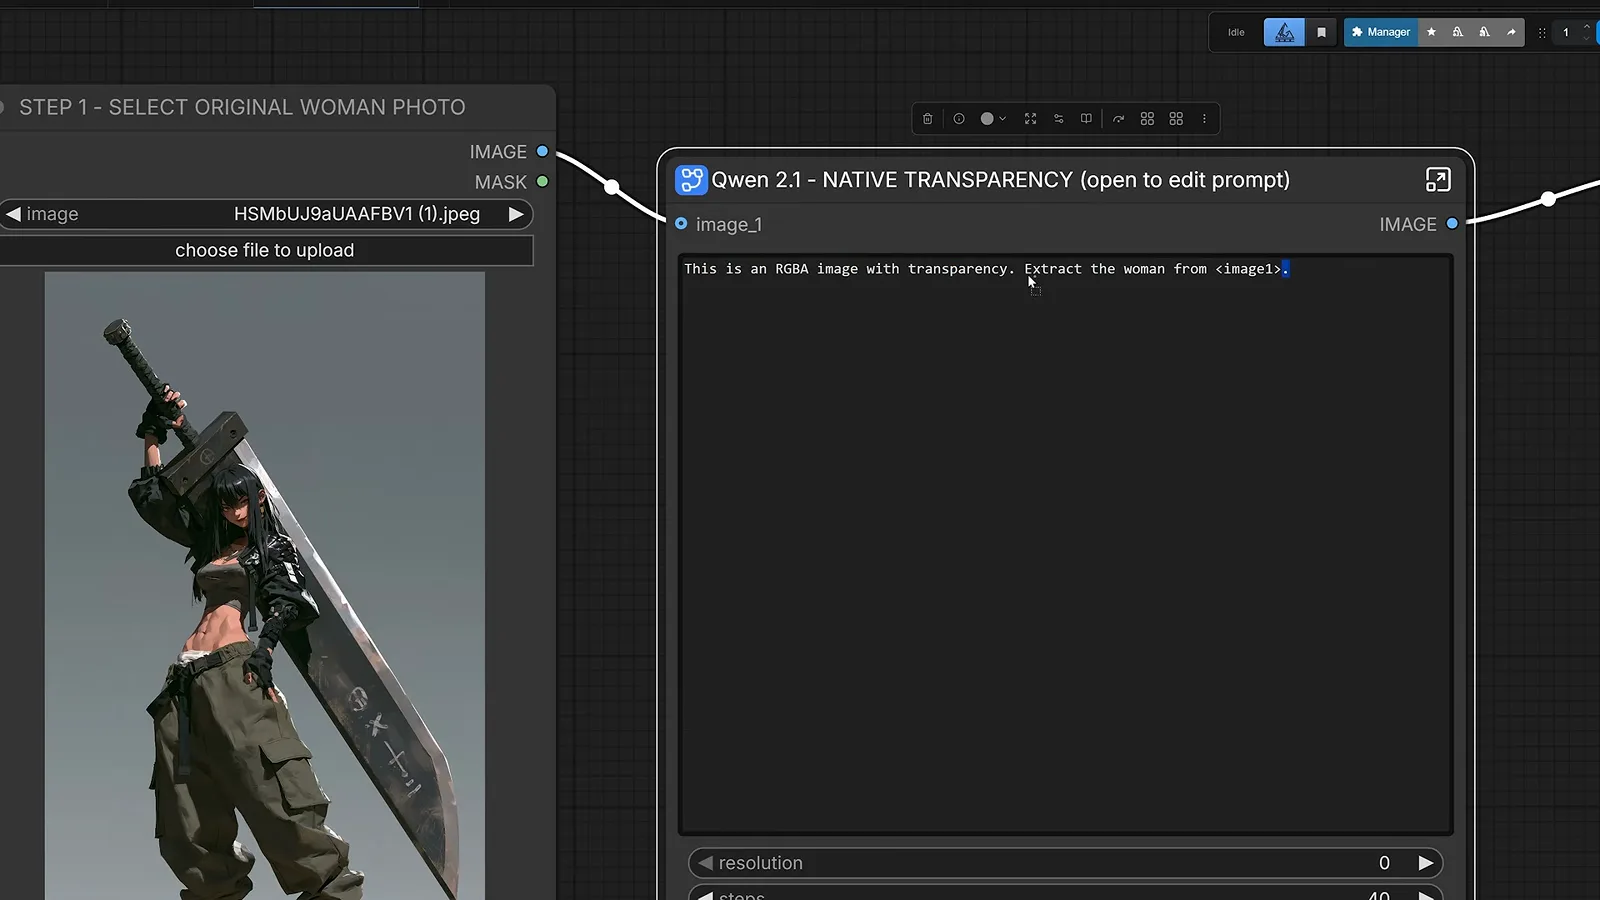
One sentence does the work of a background-removal app.Watch at 11:14 - 10
Extract any object, not just backgrounds
The same trick isolates single props: ask for the sword and the model cuts the sword out of the scene, background and owner included. Follow-up prompts can complete missing details — the tutorial had it finish a blade fragment. That turns the model into a stamp factory for stickers, products, and game props.
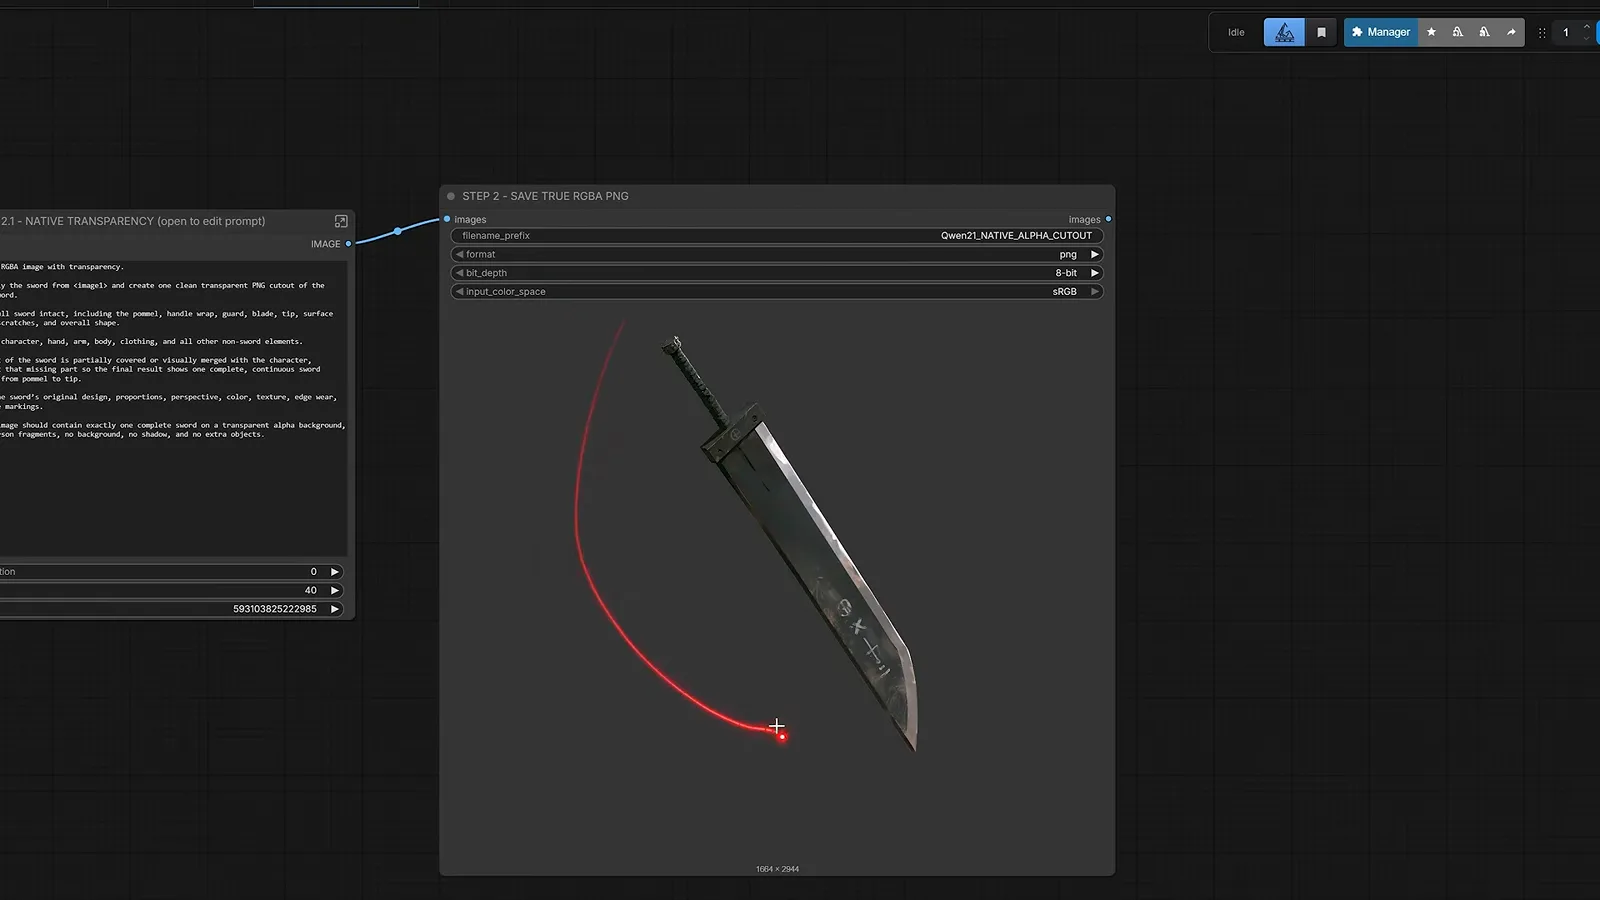
Name the object; the model handles the rest of the scene.Watch at 11:45 - 11
Tag uploads as image one, image two
In the edit workflow every uploaded photo earns a spoken tag — “image one”, “image two” — and your instruction references those tags. Keep each request to one change and spell out what must survive: “keep the face, hairstyle, pose, and background unchanged”. The creator drafts these sentences in any AI chat tool; no special node is involved.
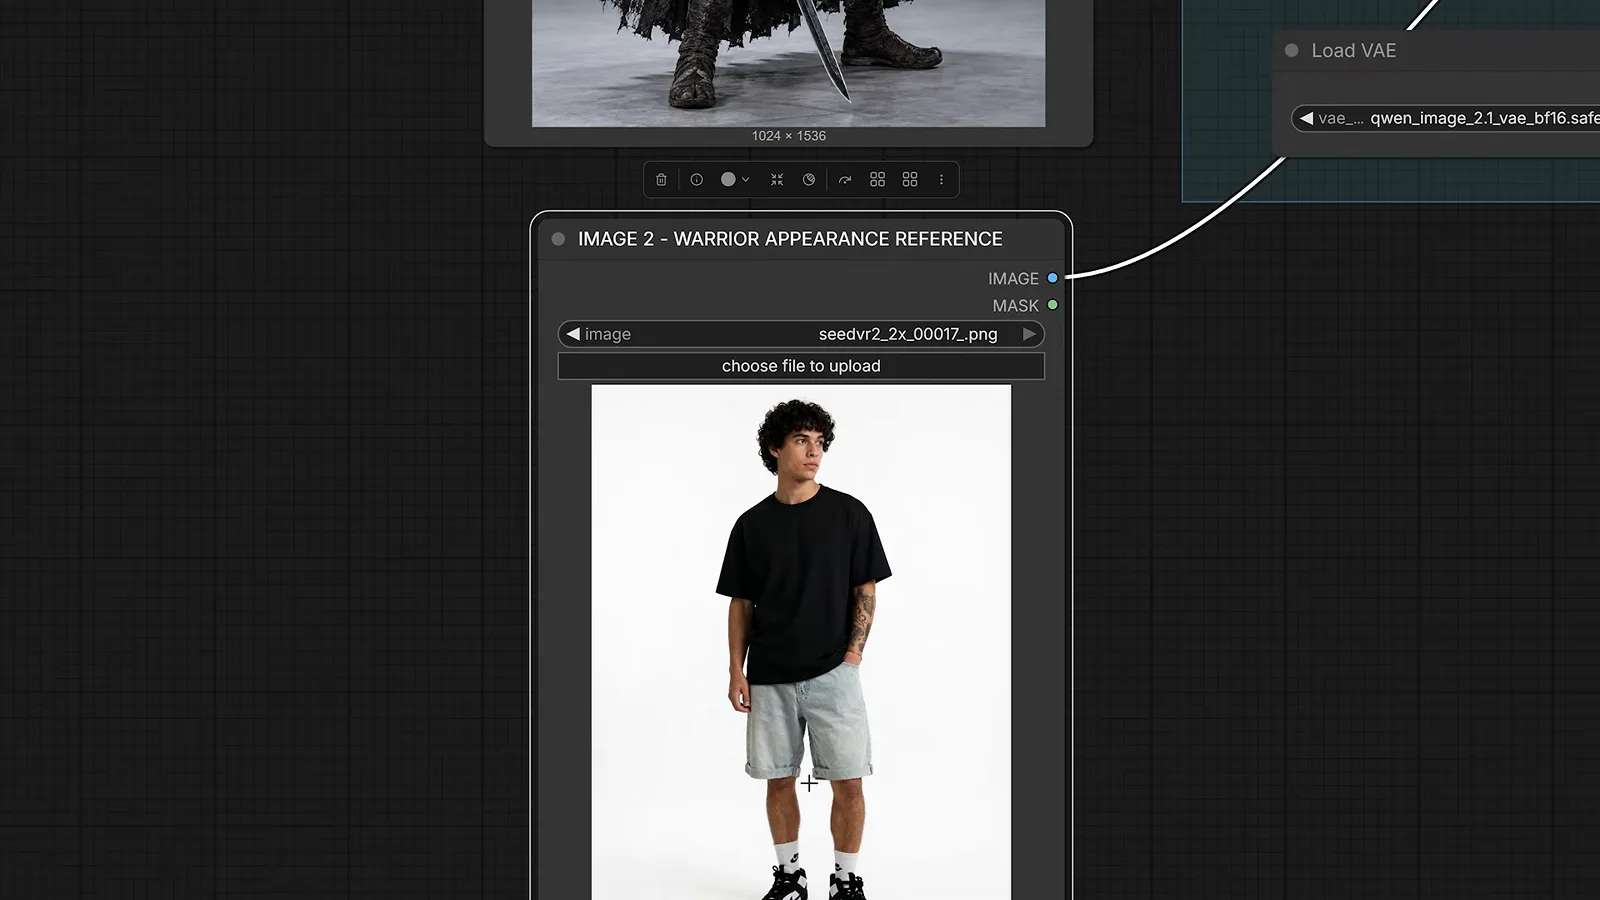
Numbered tags keep the model from guessing which photo supplies what.Watch at 13:45 - 12
Merge up to ten references in one edit
Add more image loader nodes and Qwen-Image 2.1 will blend them in one pass: the demo pulled a fur coat from a third image onto a character while shorts and shoes came from a second. Pose, face, and scene stayed put. It is the same mechanic behind virtual try-on mockups for online stores.
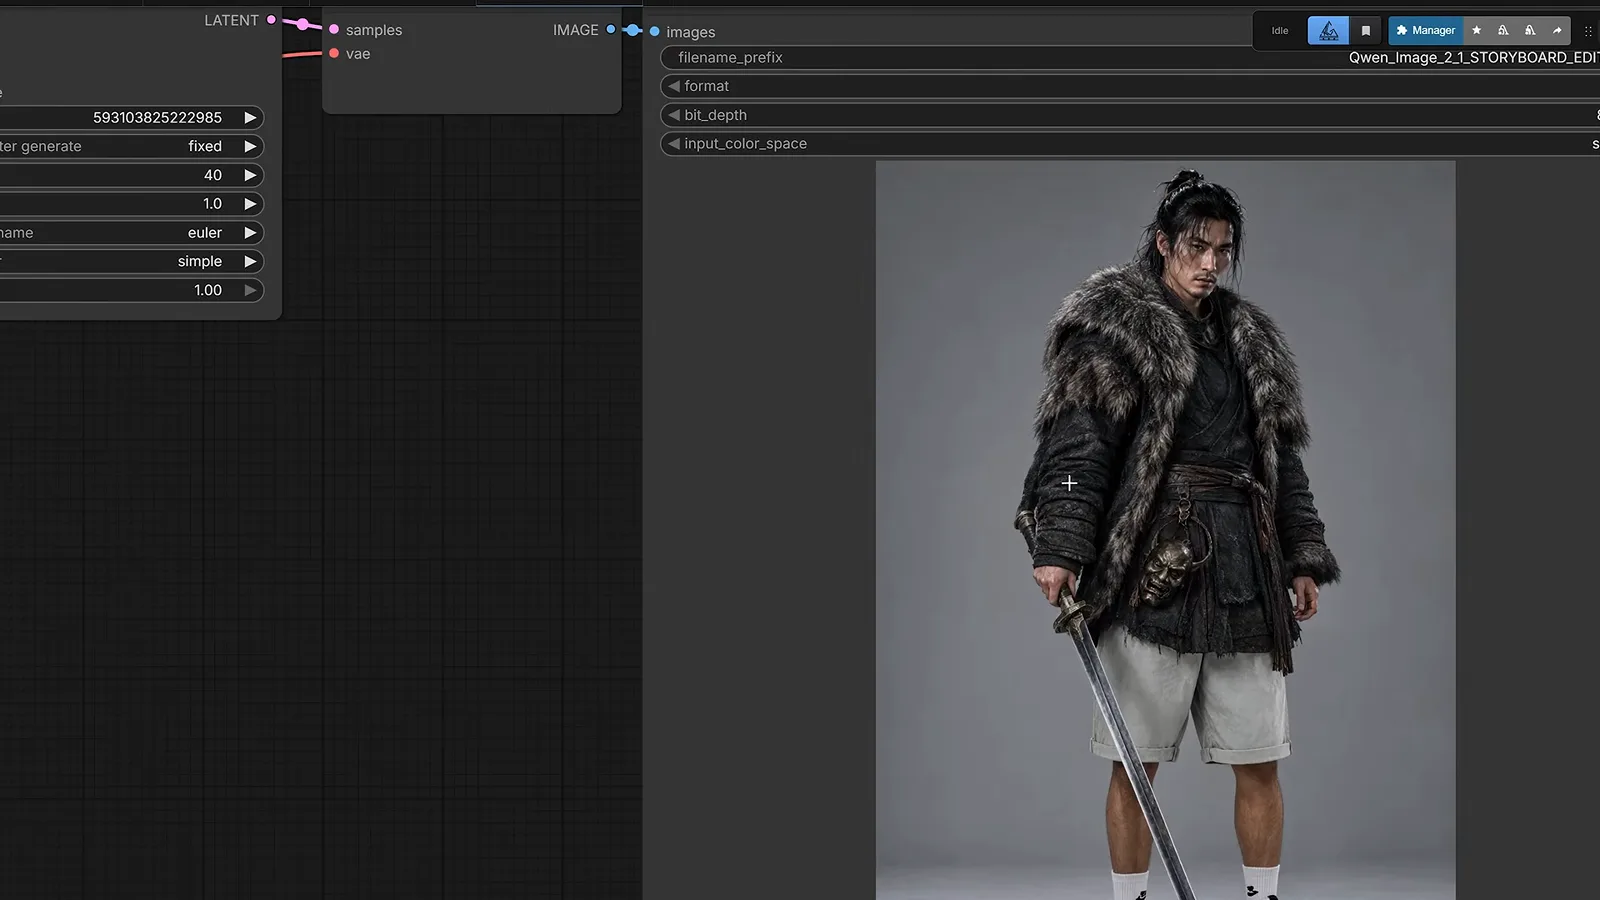
Three references, one render — and the figure never changed identity.Watch at 14:27 - 13
Grow one photo into a character sheet
Upload a character photo and prompt: “Create a character reference sheet... front, side, and back views... side by side on a plain background.” The tutorial's result held five consistent views of the same anime character, ready as reference frames for video models. Extra angles or close-ups are one more sentence away.
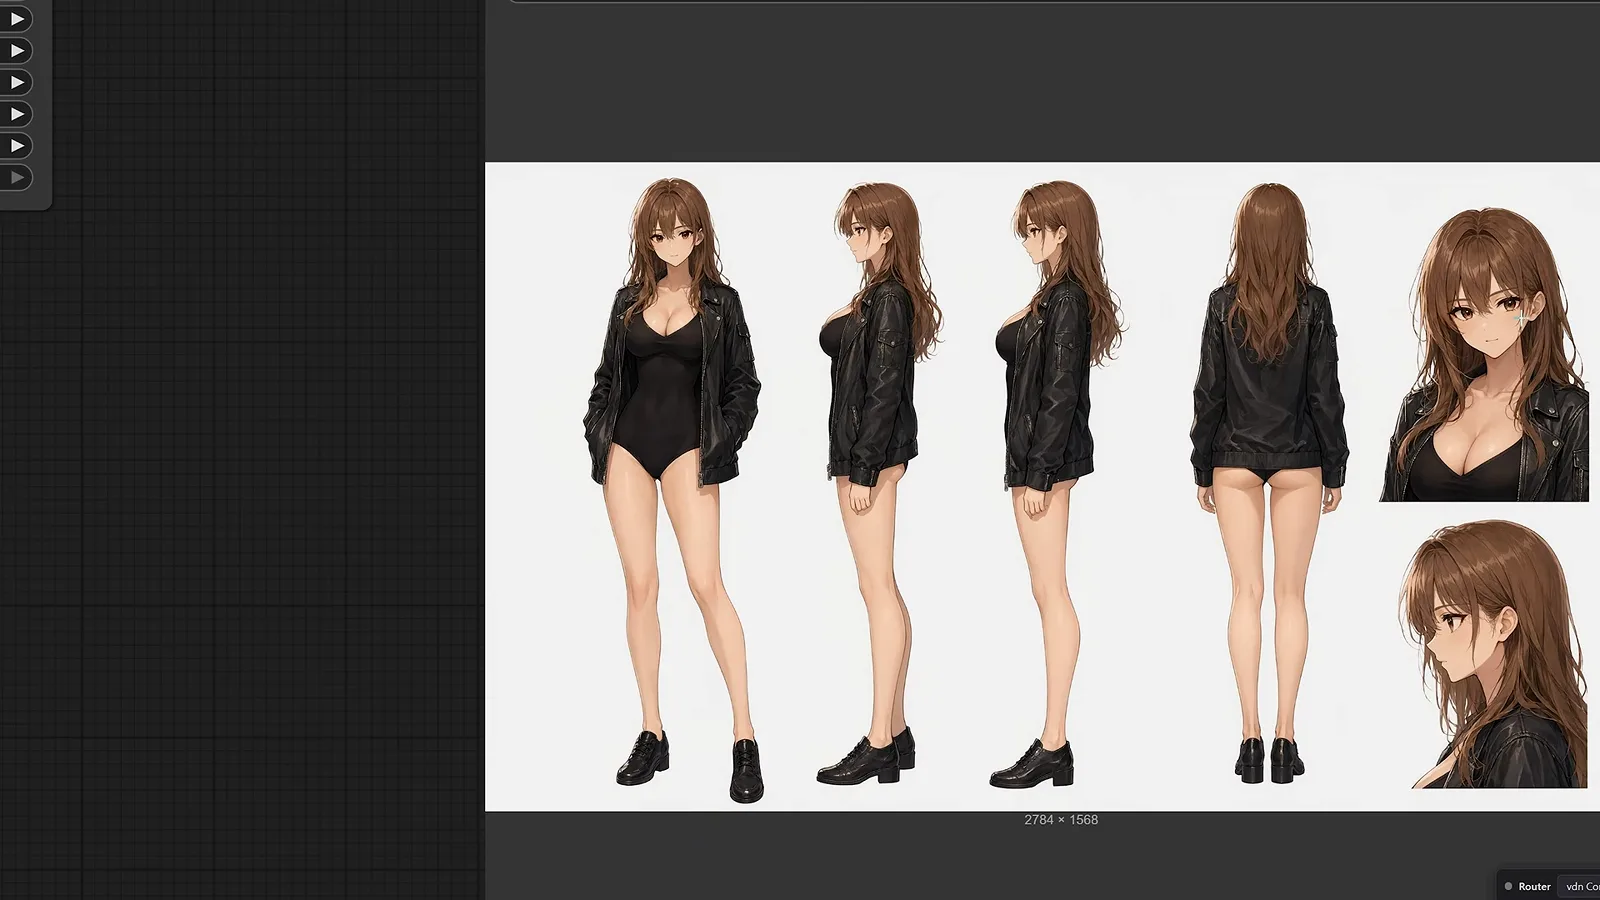
One photo in, a full turnaround out — no manual aligning required.Watch at 8:10
Settings Tips, Limits, and the License
- 14
Reshoot a scene from eight angles
Asking for every angle inside a single image backfired — the cup switched hands between views. Generating one angle per prompt kept the woman, the red can, and the wet street consistent across eight renders. That grid of stills is exactly what image-to-video models want for first frames.
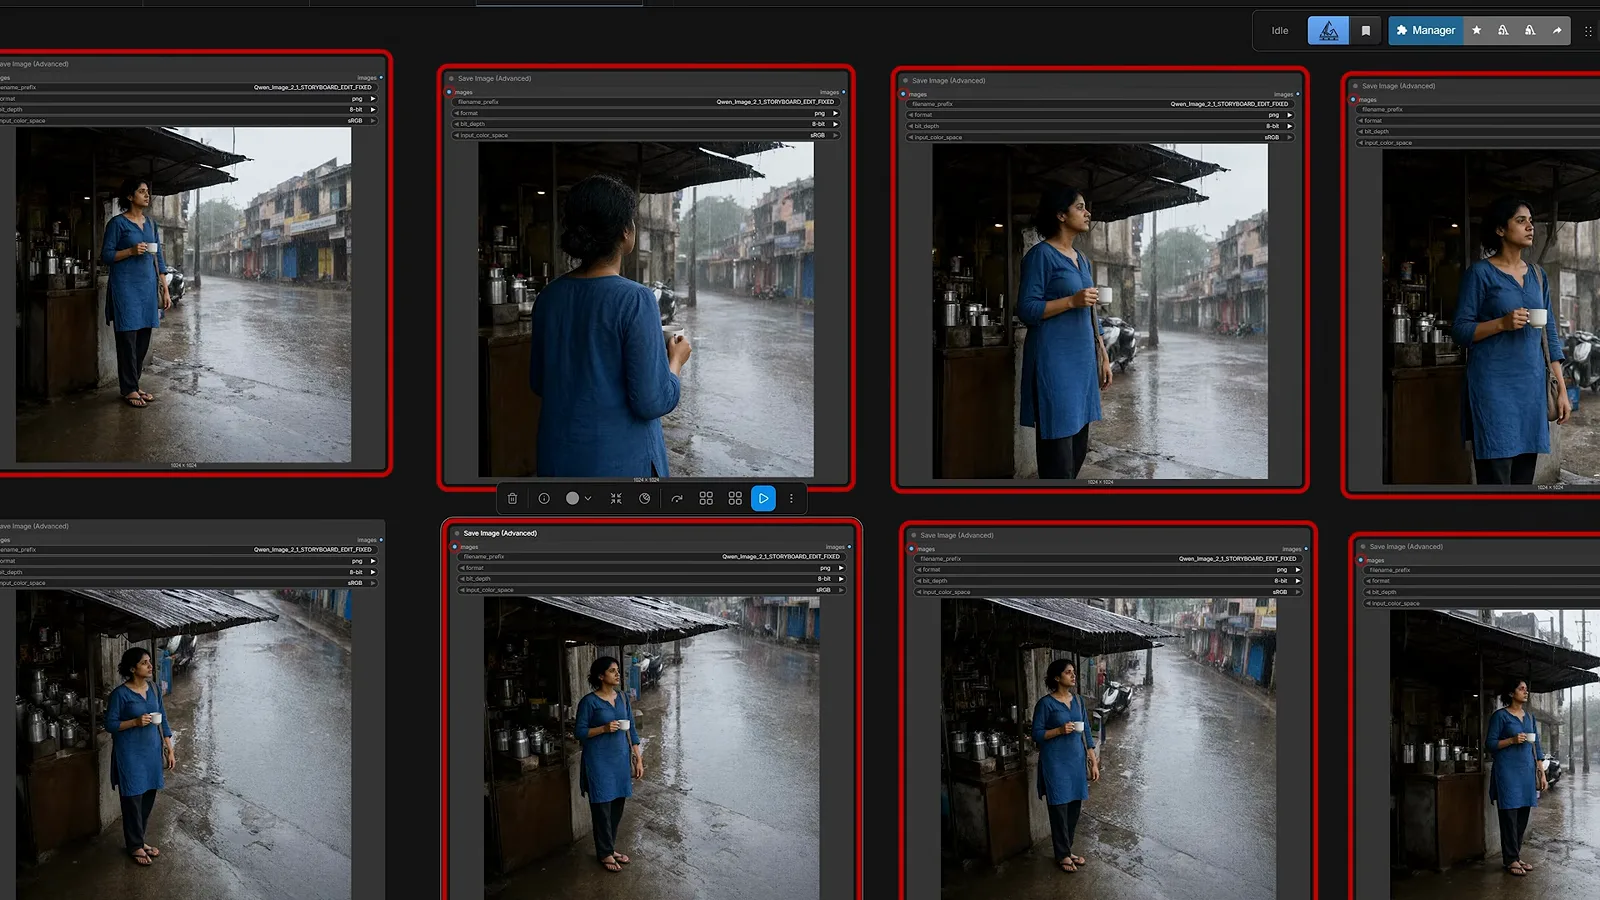
Eight prompts, one persistent world — the red can survives every cut.Watch at 15:00 - 15
Expand rough ideas with the official PE models
Qwen publishes its own prompt enhancers — Qwen-Image-2.1-PE in a T2I version for text-to-image and an I2I version for editing — as free downloads on the official Hugging Face repos. Wire one into a text-model node and a five-word idea becomes a full structured prompt automatically. A plain LLM node in ComfyUI does a similar job if you skip them.
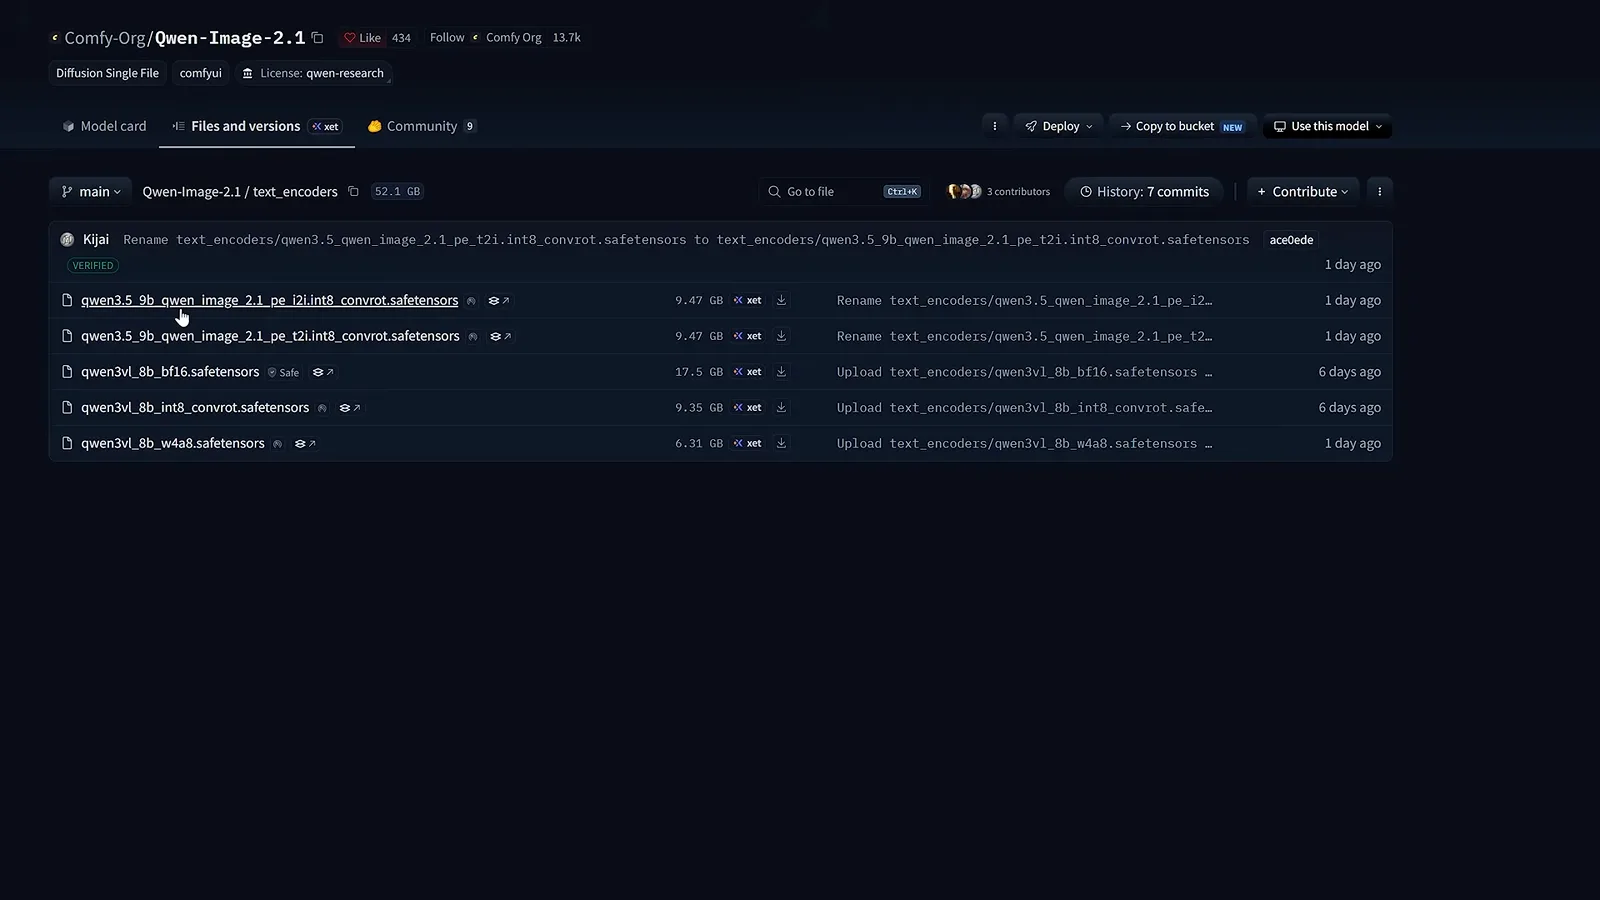
The enhancers are optional — the structured seven-slot prompt works without them.Watch at 6:03 - 16
Check the license before selling outputs
Qwen-Image 2.1 ships under the Qwen Research License — fine for learning, experiments, and personal projects, but commercial use needs a separate arrangement (the original Qwen-Image was Apache 2.0; 2.1 is not). The creator's verdict after a full tutorial: one of the strongest open-weight models he has tested, with more realistic skin than ChatGPT's images, though ChatGPT still leads on fine text.
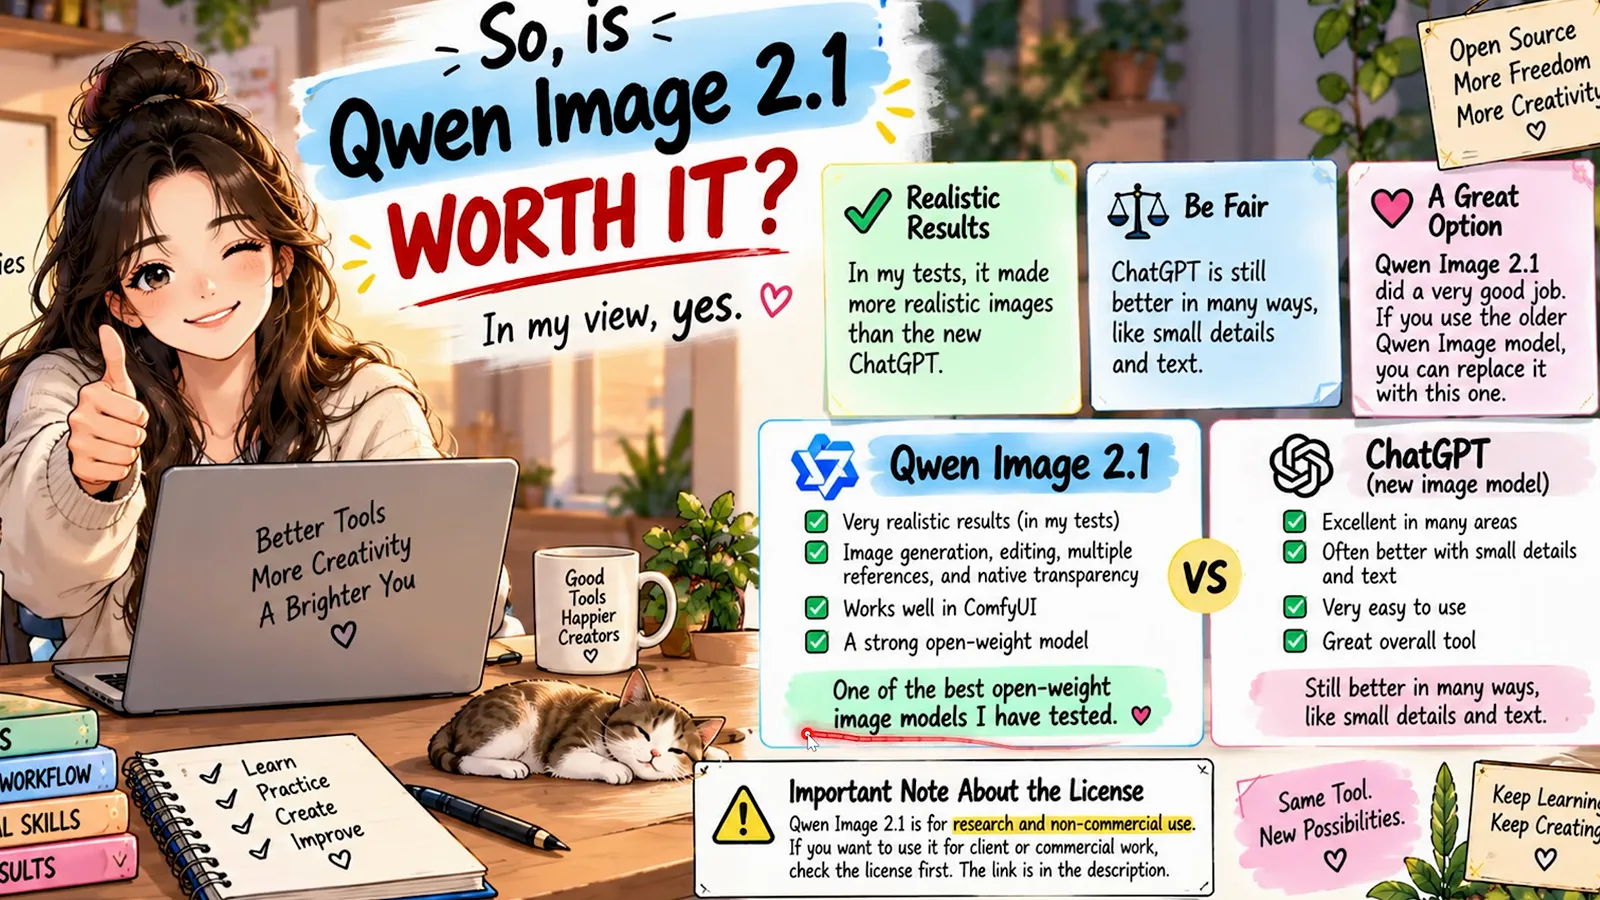
Free to learn with — read the license before client work.Watch at 15:45